Hand built bespoke bicycle frames in the heart of the Wiltshire countryside - dmoframeworks@gmail.com.
Subscribe to email up-dates (no junk mail or third parties I promise) for regular up-dates on the development of DMO Frameworks!

Saturday, 15 February 2014

A bit of a random one...Formula RX caliper rebuild...

Making bikes is ace, but riding them is even better. I realised last weekend that I had certainly let my maintenance slip on the element when I found a seized piston in the rear brake calliper and couldn't go for a ride.

As such I decided to give them a good strip down, release the seized piston and replace all the seals.

The only issue here was that I really struggled to find any literature on removing the pistons and replacing the seals on the formula RX brake callipers - so where better to put my rebuild procedure (to hopefully help out someone else trying to do the same bit of maintenance) than on my blog!

To start with I removed the callipers from my bike to wash all the crud off them - if there is one thing I've learnt about hydraulics its that cleanliness is of paramount importance.

This turned out to be fail number 1!! In hindsight I think removing the pistons would have been easier using the hydraulic force from the brakes themselves while on the bike but hey ho.

On inspection of the callipers the first thing that struck me was the large anodised red cap on the left hand side - see pic below.


I figured that you must have to remove this to service the callipers. Here began my search for the tool to remove the aluminium blanking plug. Unfortunately I couldn't find one, so in true DMO style - I just made one.

4 Pin plug extraction tool
As it turns out, and having done some more reading, you don't actually have to remove this plug to service the callipers - the hole which the plug blanks is simply there to enable the caliper to be machined - cashback!

Anywho, seeing as I had made the tool I thought I might as well use it, and as it goes it worked a treat.

Tool in position ready to remove blanking plug

Blanking plug removed - job done!
My top tip here is that, in order to undo the blanking plug, you obviously need to hold the calliper firmly. To do this I simply bolted it back onto the bike. The caps were both tight but they did undo (right hand thread) without any excessive force.

So next up was to remove the pistons - this is when I realised that the easiest way to remove the pistons is to remove the one on the opposite side of the calliper to the blanking plug first!! So back in went the blanking plug.

To remove the right hand piston simply tie a tie-wrap around the left hand piston (this stops this one coming out first) and then remove the small bleed grub screw. You need to make sure that you now blank off the "pressure in" hole on the left hand side of the calliper (where the brake hose connects to) before applying some pressure to the bleed hole.

The way I did this was to just use one of the formula bleeding syringes. The piston will just pop out. If it doesn't pop out then you will require more pressure, a compressor or even a track pump may be required depending on how corroded the pistons are in the seals. It turns out that the hose off the formula bleeding syringe is a perfect fit on my air gun - see below:


If compressed air doesn't work then the track pump should do it. In order to hook my track pump upto the formula bleed hose I found one of the removable valve inserts from an inner tube was a perfect adapter. Even with the full pressure my track pump could provide it took a fair bit of back and forth and GT85 to get the stuck piston out - but out it did come!

Next snip the tie-wrap on the left hand piston and remove the blanking plug (for the second time in my case). I then just used a 5/8's socket and my vice to press out the left hand piston, see below:


Once the pistons have been removed you can simply pick out the two piston seals and the o-ring (I used a scalpel to do this).

Next up is to thoroughly clean the calliper. I just used regular brake cleaner (Halfords, about a fiver). Once de-greased and clean I would highly recommend blowing out each small oil hole with compressed air. I was very surprised at the amount of crud that came out when I did this.

Now all the old bits have been removed and everything is clean you need to put in the right hand piston seal. Before inserting this in the calliper grease it all over with a silicon grease. 

Once the right hand piston seal is seated in its groove you need to insert the right hand piston - I used the 5/8's socket again and just pressed it into place.


Now you can grease and insert the left hand piston seal and the blanking cap o-ring.

Before inserting the left hand piston I replaced the blanking plug (just putting a touch of 243 thread lock on the thread beforehand).

To insert the left hand piston I did this by hand from the inside of the calliper body (where the brake disc runs). To seat the piston in the housing I just just used the handle of my scalpel (blade removed).


And thats about it, all that remained was to put the calipers back on the bike and bleed.

So, not much frame building here, but at least I can go out and blow off some steam on my bike!

Saturday, 8 February 2014

Internal Cable Routings - Technique Sorted!!!

One of the many things on the list for today was to finish Taylor's internal cable routing's. I had already formed the internal tubes (using my new "mini" bender) so all I needed to do was to braze them in place, fettle them back and then braze on the strengthening surrounds.

I learnt quite a bit about brazing internal routings whilst on my honeymoon a couple of weeks ago - the major lesson being to use silver solder to fit them in place and not regular brass brazing rod like I had in the past.

The reason for using silver is that its melting point is considerably low compared to brass (630-660 deg C compared to 870-809 for Sif 101 brass).

Perhaps unsurprisingly in hindsight, when I did the internal routings on my first frame I had a complete nightmare - the brass internal tube kept melting away! The reason for this is that I was using brass filler rod which melted at the same temperature as the brass internal guide tubing - fail!!

Using silver filler rod was like cheating - it made what had previously been quite a daunting process into one which I now can;t wait to do on a future frame!!

So, to summarise, I used Sif solder number 43 and the Cycle Design Stainless Light Flux paste - don't forget this flux simply dissolves in hot water.

Clean
I will be leaving the internal routings on my next bike like this - super clean.

And here is the brazed on strengthening surround piece - nice!

The last lesson I learnt today was to make sure the oxygen valve is open on your oxygen tank before you start to braze - I had just enough oxygen in the lines to get going and then this happened - messy!!


On the cards for tomorrow is finishing off the brazing of Taylors front triangle and then I need to get on and shape the seat and chainstays for both bikes.

Sunday, 2 February 2014

Bespoked frames taking shape....

I will be bringing 3 bikes with me to the Bespoked show in April. I am building two new frames, one is going to be very similar to the original Element and one is going to be a 29er+.

These new frames will be accompanied by the now rather bedraggled looking original Element frame - which by now has done over 1000 off-road miles.

A 29er+ is a "FAT" 29er which is able to fit 3.0" tires. The main design challenges with any 29er frame is fitting everything into the rear triangle, a 29er+ just exacerbates this issue whilst tyring to keep the wheelbase sensible.

The image below shows a 29er+ tire on a carbon Niner fork - there is just about an 1/8th of an inch clearance - definitely time for some helitape here!


In order to minimise the wheelbase you need to tuck the rear wheel in as close as possible to the seat-tube. However you also need to have sufficient clearance to the front sprocket. To help with this I have designed a custom steel chainstay yoke - see below:

Custom yoke, waterjet cut by Blade Engineering in Chippenham
Here's hoping the finished frame looks something like this!             


 The version of the Element 3 I'll be taking to the show will be TiG welded, however the new Element frame I'm building will be fillet brazed - here is the BB shell to seat-tube braze.


Here is the Element Number 2 frame - the first for a real customer!!
 So that's where we are up to at the moment, there has been some significant brazing learning over the last couple of weeks but I'll up-date you on this in the next post.

Until then, thanks for reading!!

Benders big and small.....and new website is launched!!

Its been a while since I have posted on the blog - what with Christmas, Honeymoon and spending a lot of time finishing the designs for the bikes I'm going to be taking to the Bespoked show in April - its been a hectic couple of months!!

I have also been working on my new website, this is all up and running now (big thanks to Neil Warwick consulting - http://nwarwick.co.uk/wp/index.php/web-design/), please check out:

www.dmoframeworks.com
 
Moving on from the Element mk1 my main aim was to make it easier to build accurate frames in the future - the way in which I was hoping to achieve this was by making a new jig and some custom tube forming tooling.

Here we have my new internal cable routing's tube bender. I machined this from aluminium and it is designed to bend the standard 7mm brass tubes used for guiding internal cable routing's.

The 7mm tube bender in all its glory - we like to call it "mini bender"
Simply slide the straight tube through the support hole
Align the end of the tube to the end of the support hole
And hey presto, perfectly bent tubing with no crimping or squashing - ace!

I found that it was still necessary to heat the brass tube prior to bending, this made it much more malleable and less likely to collapse or crimp during bending.

Next up is my new seat and chain stay bending tooling. This was a little more difficult to machine due mainly to its size and the very large radii I wanted in the tooling.

My intention was to machine a deep circumferential 16.0mm groove into a block of aluminium, into which you would align your tube and then simply pull it around the groove to the desired position. The reason for such a deep grove is to support the tube during bending, hopefully stopping it from collapsing or crimping.

Here you can see the large tooling block and the removable 'capture pin'
Simply insert the capture pin, and slide in the tube to be bent.
Then give it some beans and bend your tube around to the desired position.
And there you go - job done!!

I was really pleased with how well this worked, the bend was nice and smooth with no squashing and most importantly no ripples.

So here's hoping this works as well on the 4130 tubing I will be using for the seat and chain stays on the next two frames.

In the next post I'll be bringing you guys up to speed with the developments I have made on the bikes for the Bespoked show in April.


Sunday, 24 November 2013

The first official sale.........

I was contacted a couple of weeks ago by the wife of an admirer of the first DMO Element frame, this was followed up with the picture below - a mock-up frame she gave to her husband for his 40th - how cool is that!!!


Frame builder in the making???
Following on from this email I met up with Andy and conducted my first demo ride yesterday. 

This really is the way I like to sort a frame out for someone, you can't beat going on a ride with them, seeing how they ride the bike and how they interact with it - plus it's a great excuse to get out and go riding! 

So Andy and I set off and did quite a varied loop of the Ashton Court and Leigh Woods trails in brizzle - I spent most of the time trying to keep up with Andy (probably because he was on the Element and I was on my Zesty ;) ).
All in all the ride went well and it has resulted in Andy putting in an order for a frame - happy days! 

Now I really need to start to focus on the Bespoked show next year (where I will be sharing a stand with Beth and Ian from Wildcat Gear) - I'm hoping to have Andy's Element, my rather battered Element prototype and something a bit different on the stand for people to see - watch this space for developments over the coming weeks and months. 

Saturday, 26 October 2013

The jig MK2 - up and running.......

It's taken a few weeks but having designed and manufactured the components for my MK2 bike frame jig I finally got around to assembling it and trying out setting it up.

All the parts went together pretty well however I think I'm going to have to do a bit better with the mounting to the bench - I can see me knocking up a bespoke floor standing structure which I can bolt down to the workshop floor.

The Mk2 Jig in all of its glory!
The headtube mount
The bottom bracket mount, pictured below, is the datum for the whole jig - everything pivots around this point.

The bottom bracket mount
Seat-tube Jig
Chainstay and dropout jig
All in all the jig took me about 20 hours to make and cost me about £100 - it should tide me over until I can afford to buy a proper one - and will certainly be a whole lot better than the 'expanding' wooden one I used for my first frame.

Sunday, 20 October 2013

The Barebones 200 ITT.....Job Done!

The weekend of the 12th and 13th of October saw the running of the Barebones 200 individual time trial by Stuart at Forest Freeride.

This was my final target event to take part in on the Element this year (the other two being the Highland Trail Race and the Trans Cambrian Way).

With the Highland Trail Race not going to plan, being made up for in a small way by the Trans Cambrian going so well, I was really looking forward to this event.

I approached it with the ethos of enjoyment not being compromised by trying to "set a time" - this is a handy philosophy when one is not fast on a bike and likes to sleep in random places!!

Upon arriving at Stu's place it became immediately obvious to me that the event had a certain air of seriousness about it, unlike the now hugely popular 'Welsh Ride Thing' held here earlier in the year, there were many very lightweight looking setups - no trailers or bottles of whiskey here!

To describe the event to the uninitiated, it (turned out to be) a 213km individual time trial, no support, no food stashes and no prearranged accommodation. Competitors are encouraged to complete it in less than 24 hours for a black badge, less than 30 hours for a blue badge and for simply completing the route they are awarded a green badge.

Having completed the 106 miles of the TransCam a couple of weeks ago in 29.5 hours my target was to try to up the pace a bit and sleep a bit less and complete the BB200 in a similar time.

PP, Keith and I had planned to ride together - they both had black badges already and kind of fancied a slightly more chillaxed event (having slept/collapsed in a public toilet on the previous event).

So we started out, and the first bit of the route was predominantly on road, Keith and I pulled out a bit of a gap and it started to rain. I stopped to put my jacket on, signalling to Keith my intention - to which he replied "I'm going to keep going - you'll catch me up" - this was the last I saw of Keith until Sunday morning!!

The main obstacle on day one was the 537m of Carnau I knew this bit was going to be tough both physically and navigationally but what I hadn't accounted for was having an off! On the descent off Carnau there is a ford you have to cross - seemed straight forward enough - I approached it as any other - speed is your friend, however I hadn't accounted for how slippy the rocks leading up to it would be. Before I could even consider bailing I was over and in. This in itself wasn't ideal, but then it could have been worse I reasoned as I pushed my funny sounding bike out of the ford. it was only when I went to ride off that I noticed I had in fact bent the rear mech completely into the rear wheel - fail!! The only thing I could do was bend it out and carry on, on closer inspection it turned out I had bent both the mech and the sliding aluminium dropout.

The original plan was to stop at Moel Prysgau bothy, the half way point of the route, so essentially I just plugged on to this meeting point. The terrain was hard going but far from impossible (and far easier than the Highland Trail Race) - I eventually arrived at the Bothy at 6.15pm. It was at this point that I recalled a conversation I had had in the week leading up to the event with PP. He had mentioned that you can access the Bothy from a fireroad above it - meaning you can avoid the very wet marshy bit to get to the Bothy.

So, as discussed, I cycled up and around behind the Bothy, expecting to find a bit of a bank which I could descend to the Bothy - unfortunately what I was confronted with was what can only be described as a bloody steep rocky bank - it was at this point I cursed PP!! It was only upon turning around that I spotted a footpath which led me to the Bothy.

Upon arriving I was greeted by four walkers who had the fire going and were making their evening meal. With it still being light outside it really didn't make sense to stay - but it was very appealing none the less.

With a heavy heart I bode the walkers farewell and continued on, with the aim of getting to Pontrhydfendigaid - there was a pub there.

I got the Black Lion Hotel at about 7.30, having ridden up the 7 splashes out of Moel and with it now raining and dark it was a welcome sight.

I quickly bought a pint and some nuts and sat with 3 other competitors. While sitting at the table one of the waitresses came to clear the plates and I found myself asking her to leave them so I could finish off the chips someone had left - I thought "Stu would be proud of me"!!

The pub was only 10km from the best bothy ever - Claerddu. Leaving the pub was not made any easier by the landlord who came over and offered B&B for £30. But again, I politely declined and went out into the now very blustery and wet night.

The climb out of Pontrhydfendigaid is predominantly on road, and albeit a bit of a slog (not made easier by the headwind and driving rain) it really wasn't too bad. The road turned into more of a track and it was at this point that I was overtaken by a VW transporter - which I thought nothing more of.

Arriving at the left turn for the Bothy I also came across the, now parked VW. On riding to the bothy I overtook 5 walkers - who it turned out had driven up in their car!! I got there, pretty wet and tired, only to be pampered by the walkers who not only got the fire going but also made me a cuppa and gave me a mince pie - now this is what I call roughing it!!!

I decided to get up at 5.30 and be back on the bike for 6, which all worked out ok - especially knowing that the trail around the reservoir was easy to follow.

I made pretty good progress and before I knew it I was skirting Penygarreg Reservoir - at which point I came across Keith - having a brew and some breakfast. It was at this point that we decided to ride the last bit together - which was nice.

We knew from reports of recces etc that the last 15km were not ideal - with some pretty conceptual pushes - which is why, when at 192km in, I got worried because i had so little energy left. My "rational" fix for this was to eat my last ham and coleslaw roll, half a malt loaf, an entire chocolate covered kendal mint cake, half a pack of raw jelly and two lumps of Yorkie - I had now gone from feeling low on energy to feeling sick!!!

The final push didn't disappoint - but to be honest it was kind of nice to be out of the saddle for a bit using different muscle groups.

We eventually rolled back in to Stu's place a little over the 29 hour mark - happy days!

So all in all, 2 of three targets for the new frame have been achieved - now its all about getting more miles on over the winter to try to hit the 1000 mile mark for the Bespoked show in April.

Thursday, 26 September 2013

More of the mk2 jig........

Here we have my new headtube support tooling, this will eventually slide and rotate on a long plate giving me loads of adjustability for just about any frame. 

I

I have finished machining the other plates to size next up is to machine the relevant slots in them and the jig will be compete. 

Tuesday, 24 September 2013

The Trans Cambrian Way - At Last!!!!!

Its been a while since the last post - two months in fact - but a lot has been going on in the world of DMO Frameworks - more on that over the next couple of weeks.

But for now I just had to write a bit on the blog about my recent attempt at a sub 30 hour, solo, Trans Cambrian Way ITT.

Epic rides like the Trans Cambrian Way were right at the essence of my first build - I wanted a bike that would be comfortable for long hours in the saddle but at the same time responsive enough to really attack the often too rare bits of singletrack on these types of rides.

Well, with the first frame having ticked over the 500 mile mark a couple of weeks ago and an opportunity in the build schedule arising for me to take some time out and have a go at the TCW.....and here's my brief story.....

I got to Knighton at 9.45am and eventually got under way at 10.30, having taken the obligatory photo at the station...


Having mowed down a corned beef slice it was time to head off, the plan was to get to Rhayader and then assess how realistic or otherwise it was going to be to make it to Claerddu bothy.

I had in the back of my mind that the track around Claerwen Reservoir was a bit harsh and that was from riding it on my full susser last year - riding it on a fully rigid 29er was going to be a completely different experience - hopefully no worse, but none the less I definitely wanted to save something in the tank for that section.

With this in mind I just tried to keep a steady 10kph pace and not get too carried away - the target was to get to Rhayader by 4pm - but as it happened I got there shortly before 3 - which was nice!

At Rhayader I treated myself to a can of coke, a hot chocolate, a coleslaw and ham sandwich and some welsh cakes. I have found that ham and coleslaw sandwiches appear to be my "endurance comfort food" - there is only so much raw jelly, gels and malt loaf I can handle!!

Having arrived at Rhayader early I knew Claerddu bothy was well doable - so I set off at 3.15 with the aim of getting to the dam at Claerwen by 5pm. 

What I hadn't accounted for was the roughness of the final track that leads you to the dam - this was easily the toughest bit on a rigid bike of the route for me.

It took me 45 minutes to get around Claerwen and then another 30 mins to get to the bothy - I think by this point I was certainly starting to flag - I seem to remember singing out loud "we're on our way to Claerddu" over and over again.......anyway all of this joviality was treated with the following view:


What a sight for sore eyes!!

Once here I settled in, and the weather joined me - at one point I couldn't see the retaining wall around the bothy from the front door!!

As it turned out I stayed at Claerddu for 14 hours!! 9 of which was spent sleeping the rest just cooking, eating, reading and checking over the bike. My original plan was to get up early doors and head out while it was still dark - but I had somehow miss-place my light.

One thing which did freak me out was, when going to the toilet in the night, I was stood there outside the bothy and you literally couldn't see 5ft in front of you - the mist was that bad - I kept imagining something flying out of the mist towards me - needless to say I didn't waste much time in getting back to bed!!!

I eventually left the bothy at 8.15 Sunday morning reside to the fact that I probably wasn't going to make the sub 30 hour initial target, as such I just set off at a steady 10kph pace and surprisingly quickly got back into the swing of things.

It was at this point that I had the most harrowing moment of the ride - while riding on the road towards Ysbyty Ystwyth I came across a cattle grid with 5 sheep next to it, so, as standard, I slowed right down and all the sheep seemed fine until I got onto the cattle grid. It was at this point that one of them legged it - so they all legged it. Two made it over the cattle grid, one ran in the other direction and two got caught in the cattle grid - one of which managed to make its way under my bike!!

It turns out there is no capacity for a sheep working out how to get off a cattle grid - they just panic and scramble around - I was pretty worried they would injure themselves in doing so but having checked on the two which eventually freed themselves all was well.

The next section of note was the Hafren Forest - on approaching the forest all I could hear were motorbikes - it turns out that as luck would have it I had chosen the weekend of the Hafren Forest Rally to do the TCW. Fortunately a friendly Marshall kindly offered to chaperone me against the flow of the race - he even pointed me in the right direction and warned me of the slippery ford - which I duly ignored only to find out exactly how slippery it really was for myself!!!

One common theme that ran consistently throughout the ride was that the 4th weekend in September must be the weekend for farmers to trim all their field hedges - the amount of bits of hedge which punctured my tires was silly - its just as well I was running tubeless!

Without wanting to give too much away about the final 20km of the route (for fear of spoiling it for those yet to give it a go) - it was a bit of a roller coaster.

In the early stages of the ride I got a bit annoyed every time I came to a road section - from my perspective the more off road the better. However as the ride went on I found myself looking forward to a road section for a break! I found myself asking "is this the last road section to Dovey" a lot. However after each bit of road came another bit of off road - it was at this point that I really realised just how many ace bits of the remote welshland I had ridden - see below:


All that remained now was to roll into Dovey - as it turned out I had 8 minutes to spare before the train  - happy days!

Job Done!!


So all in all I can thoroughly recommend the TCW, in the end it took me just under 29.5 hours to make it from Knighton to the Dovey Junction - not too shabby. The Element performed really well and ticked over its 650th mile with relative ease - the aim now is to hit the 1000 mile mark before the year is out.

The next major ride will be the Barebones 200 followed fairly shortly by the Real Ale Wobble.


Sunday, 14 July 2013

The DMO bike frame jig Mk2.......

Well its been nice and sunny all weekend, but I figured before it got too warm outside I would try to finish off the main aspects of the new frame jig so that I can order the material next week.

I tried to finish it off last night but it was about 30 degrees and I'd had a couple of beers so it probably wasn't the best time to make design decisions!!

Anywho, I digress, please see below for some screen shots of the new frame jig. I'll get all of the main secitons rough cut to size so that all I have to do is mill in the slots and we're laughing!!

The DMO Element Frame on the new frame jig
Plan view of the jig - hopefully there is enough adjustability to suit most frames

Everything rotates around the bottom bracket as the datum

Friday, 12 July 2013

I forgot....here's a bit of a teaser for you regarding frames 2 and 3.....

I completely forgot to tag onto the end of my last up-date a little teaser I have for you guys.

It just so happens that two people who have seen (and like) my frames have (rather fortunately for me) asked me to make them something rather different from the bikes you normally see out on the trails.

Here is a little teaser for you guys, over the coming weeks more of the details of the frames will be posted here on the blog with production due to start just as soon as I have finished manufacturing the new frame jig (hopefully by the end of August).

Anyway there is a prize in it if anyone can guess the format of frames number 2 and 3 from the following spy shot below taken deep in the DMO R&D workshop ;)


Dennis, Michael & Oliver!!!

Well I'd like to start this blog post with an apology - sorry to everyone who has emailed wanting to know what is going on with DMO Frameworks! To say its been a bit of a whirl wind since both the Bespoked Bristol show and the Spin London show is somewhat of an understatement.

I was completely overwhelmed with the feedback I have had from the shows, and from the blog directly - I've now had nearly 6000 hits which is quite amazing!

Anywho, one of my motivations while building frame number one was to get a picture of the three of us with the finished article - well here it is.....


I think I'm going to have to get this one framed and hung up in the workshop.

The beedy eyed amoung you will have noticed that the bike is now geared, this is because I took part in the inagrual highland trail 430 race on it at the end of May - more to follow on this shortly.

I am currently in the process of designing my frame jig MK2, hopefully I'll be in a position to put some screen shots of this on the website by the end of the weekend.

Anywho, I'd better get back to it!

Cheers.

Olly

Saturday, 20 April 2013

Bespoked Bristol 2013 - The Launch of DMO Frameworks.....

Well, after so much prep and anticipation, the Bespoked Bristol show 2013 has come and gone - so now its time for a quick review and a look at some more pics...

I set up the stand on Thursday, which on reflection was very much ahead of the game - with some people still yet to arrive at 2pm on Friday afternoon!!

The press and industry insiders were released upon the show at 3pm - this included the judges who would look at all of the bikes on show and choose the winners of the much coveted awards.

It was very encouraging to see some legendary frame builders in attendance, and I was very pleased to receive the following feedback on the bike from none other than Dave Yates "it's very nice, an impressive first build". Well, what more could I have wanted from the show than recognition of that calibre!!

So far the frame has been featured on the following websites and forums:

Singletrack - http://singletrackworld.com/2013/04/missed-bespoked-bristol-heres-the-report/

Road CC - http://road.cc/content/news/80868-bespoked-bristol-2013-sneak-peek-video-donhou-feather-paulus-quiros-rourke

Headset Press - http://www.headsetpress.co.uk/bespoked-bristol-2013-photos-part-2/

Wildcat Bags - http://wildcatgear.co.uk/2013/04/02/bespoked-bristol-2013/

I would have posted a review sooner, but to be perfectly honest its all been a bit of a whirlwind since the show. I have been very flattered indeed to have quite a bit of interest in the frames - which has come as quite a surprise.

As such I'm currently quoting on a few frames, one of which will hopefully be something a bit special for next years show!!

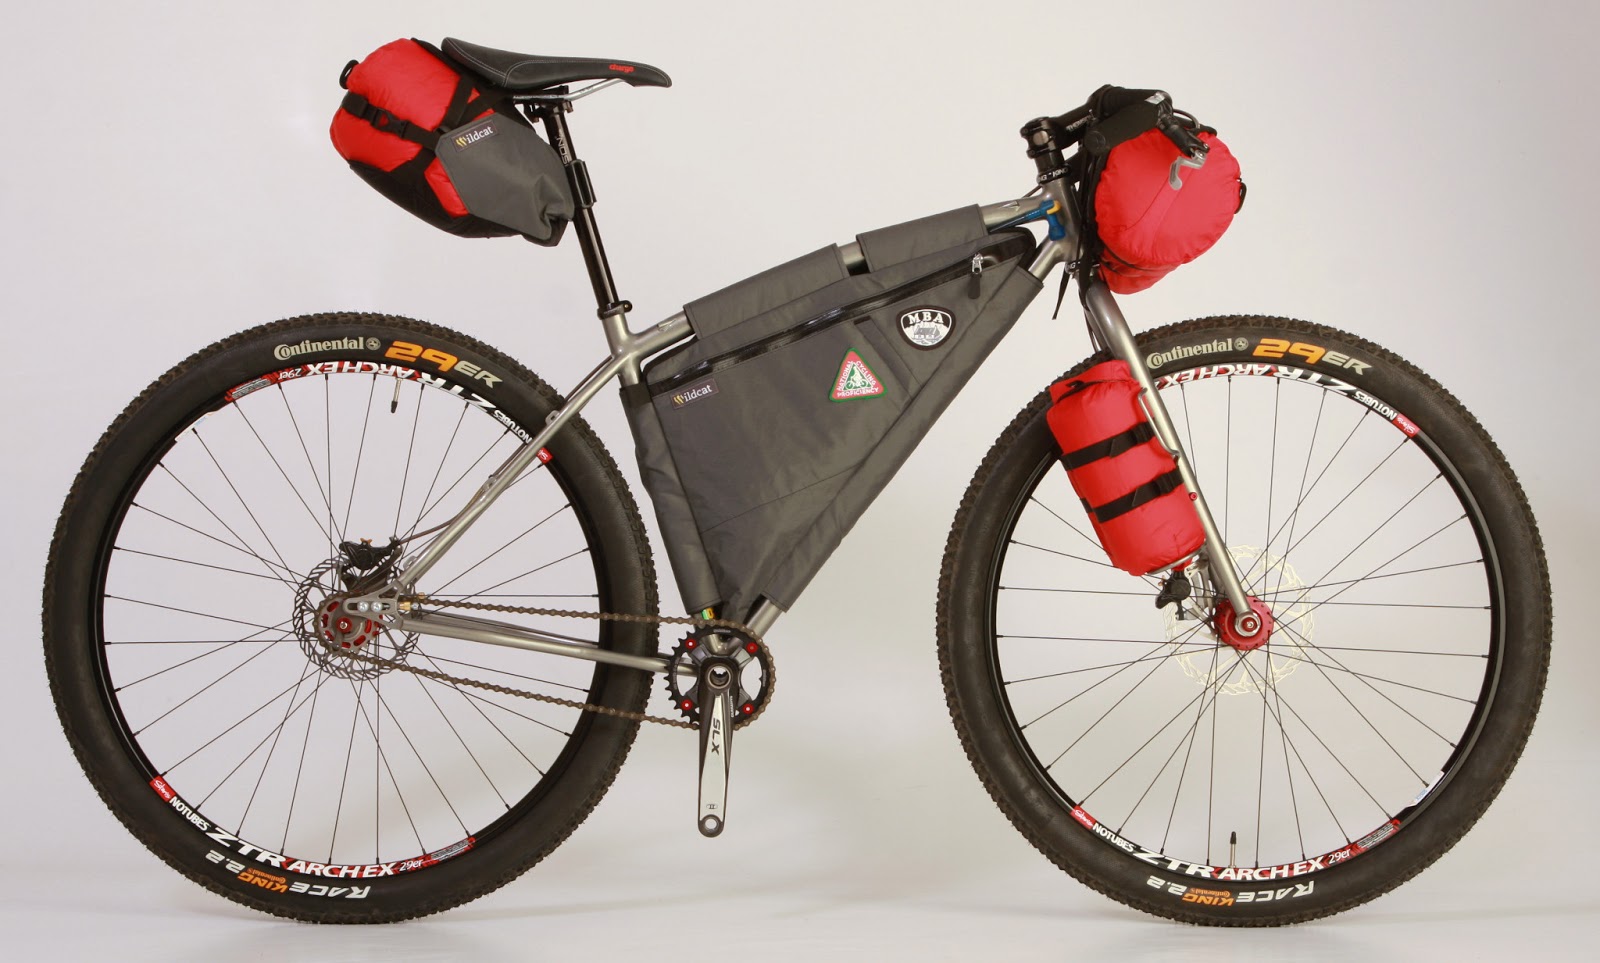
Anyway, please see below for some of the 'studio' shots of the DMO Element at Bespoked 2013 - I hope you like them!!

Cheers,

Olly

DMO Element - Full Bivvy Spec
DMO Element - Conventional Ride Spec


DMO Element - Dropout Detail
DMO Element - Headbadge Detail
DMO Element - Front View